
17 Nov 2024
How I set up my Mac
This guide includes a lot of free apps I use on my Mac. I have a comprehensive list of these in Github and Google Sheets.
Brewfile minus work apps; Brewfile Full/Brewfile for everything), my Ghostty and Starship configs are added (see 1.6), and apps I no longer use are marked as such.i. From your previous Mac/install
1 - Install apps
1.1 - Install Homebrew
Install Homebrew using the following command:
/bin/bash -c "$(curl -fsSL <https://raw.githubusercontent.com/Homebrew/install/HEAD/install.sh>)"1.2 - Install packages
1.2.1 - Brewfile placement
Place the Brewfile (which you downloaded from here, or created yourself) in your /usr/ directory — you can get here in Finder by selecting Go > Go to Folder... (or pressing ⌘ + ⇧ + G) and typing ~/. Terminal should launch here by default.
1.2.2 - Installation
Open Terminal and run the following command:
brew bundle install(If you have your Brewfile in a different location, you can specify this by running brew bundle install /path/to/Brewfile)
1.2.3 - Auto-updates
I like my packages to update automatically, so I use the Homebrew Autoupdate package which just uses the built-in autoupdate mechanism within Homebrew. It is in my Brewfile, but if you want to install it yourself, you need to use:
Alternative to using a Brewfile
1.3 - iOS/iPadOS Apps from the Mac App Store
These cannot be downloaded using mas. You have to download these manually. Currently the two I have installed are:
| App name | Link |
|---|---|
BlueSky | Mac App Store - BlueSky |
X | Mac App Store - BlueSky |
1.4 - Other sources
1.4.1 - The other apps I install outside of these two places are:
| App name | Link |
|---|---|
Lossless Switcher (no longer used) | Github - Lossless Switcher |
OpenType Feature Freezer (no longer used) | Github - OpenType Feature Freezer |
ShazamScrobbler | Github - ShazamScrobbler for Mac |
AirBattery (no longer used) | Github - AirBattery |
TheBoringNotch (no longer used) | Github - TheBoringNotch |
1.4.2 - TheBoringNotch is not yet signed by Apple, so when first launched, it will show a popup saying it is untrusted. Click Okay, then on your Mac go to Settings > Privacy & Security and scroll until you see a button saying Open Anyway.
1.5 - Additional app downloads
1.5.1 - Adobe: brew will have installed Creative Cloud but it will not have installed the apps. Sign in and download the apps. (No longer used, November 2026.)
1.5.2 - Xcode: Xcode needs to install additional bits. Launch it and download the relevant environments.
1.6 - App configs
My app configs are in the configs/ folder of the mac-setup repo.
1.6.1 - Ghostty (my terminal): copy configs/ghostty/config to ~/Library/Application Support/com.mitchellh.ghostty/config. Its custom-shader line points at a local copy of the CRT shader in ~/Github; clone that first, or remove the line.
1.6.2 - Starship (my shell prompt): install it with brew install starship (it's in the Brewfile), install a Nerd Font such as JetBrainsMono Nerd Font and set it as the terminal font, then copy both files in configs/starship/ to ~/.config/. starship.toml is the full layout; starship-plain.toml is a plain-ASCII version for Apple's Terminal. Add this near the top of ~/.zshrc:
case "$TERM_PROGRAM" in
  "Apple_Terminal") export STARSHIP_CONFIG="$HOME/.config/starship-plain.toml" ;;
  *)                export STARSHIP_CONFIG="$HOME/.config/starship.toml" ;;
esac
eval "$(starship init zsh)"
2 - Install fonts
2.1 - Google Fonts
Install all the fonts from the google/fonts repository by doing the following. The --depth 1 flag fetches only the latest version and skips the repo’s ~2.8 GB of git history, keeping the download smaller while git pull still works for updates:
cd ~/Library/Fonts/git clone --depth 1 <https://github.com/google/fonts.git> google-fontsUpdating fonts
cd~/Library/Fonts/google-fonts/&&git pull --depth 1Removing fonts
rm -rf~/Library/Fonts/google-fonts/
Source: https://www.junian.net/tech/macos-google-fonts/
2.2 - Apple Fonts
I usually need to use some of Apple’s fonts (like San Francisco), so I download them from
https://developer.apple.com/fonts/.
2.3 - Fontshare
There is no way to install all of these at once. Unfortunately you have to go and select 'Download' on each from
https://www.fontshare.com/
3 - Settings
3.1 - System Preferences
3.1.1 - Desktop and Dock
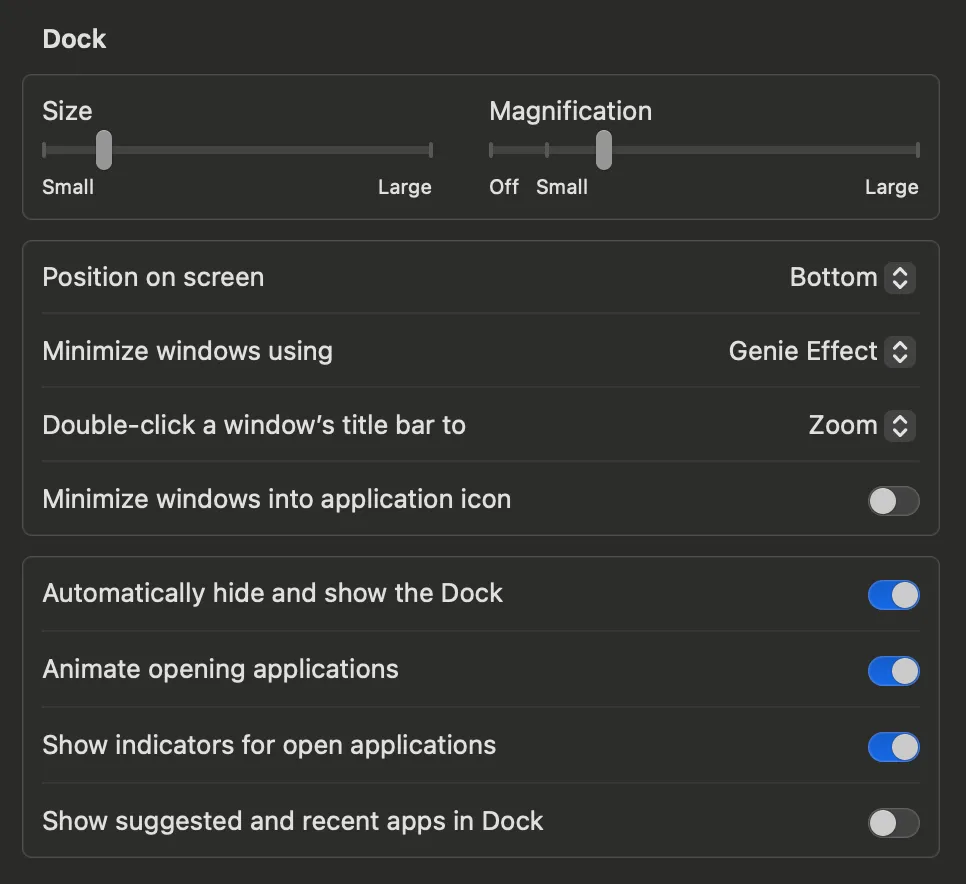
I turn on Automatically hide and show the Dock and set the size and magnification as shown here:
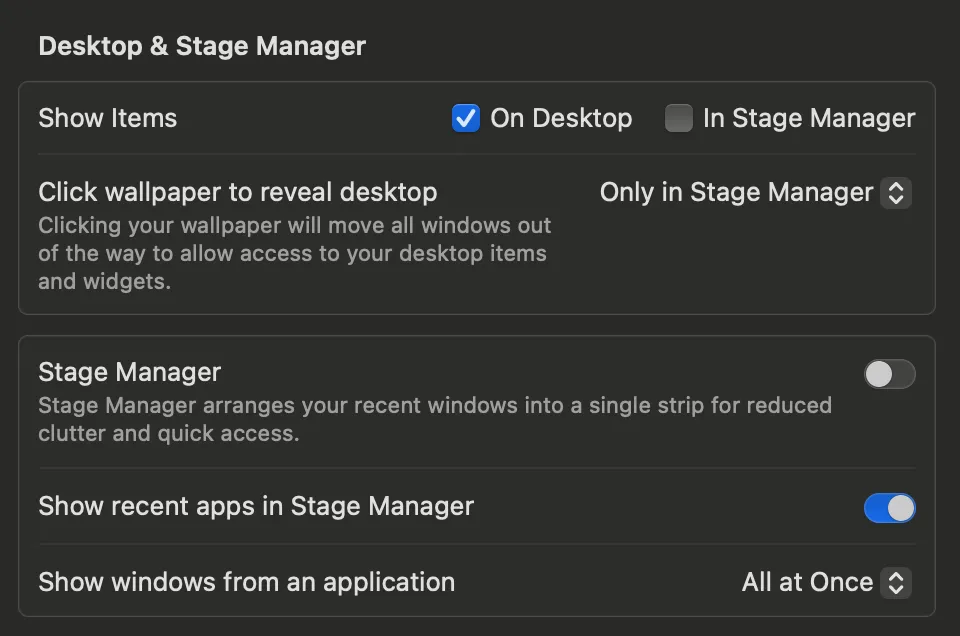
In Desktop & Stage Manager I also set Click wallpaper to reveal desktop to Only in Stage Manager and turn off Stage Manager
3.1.2 - Windows
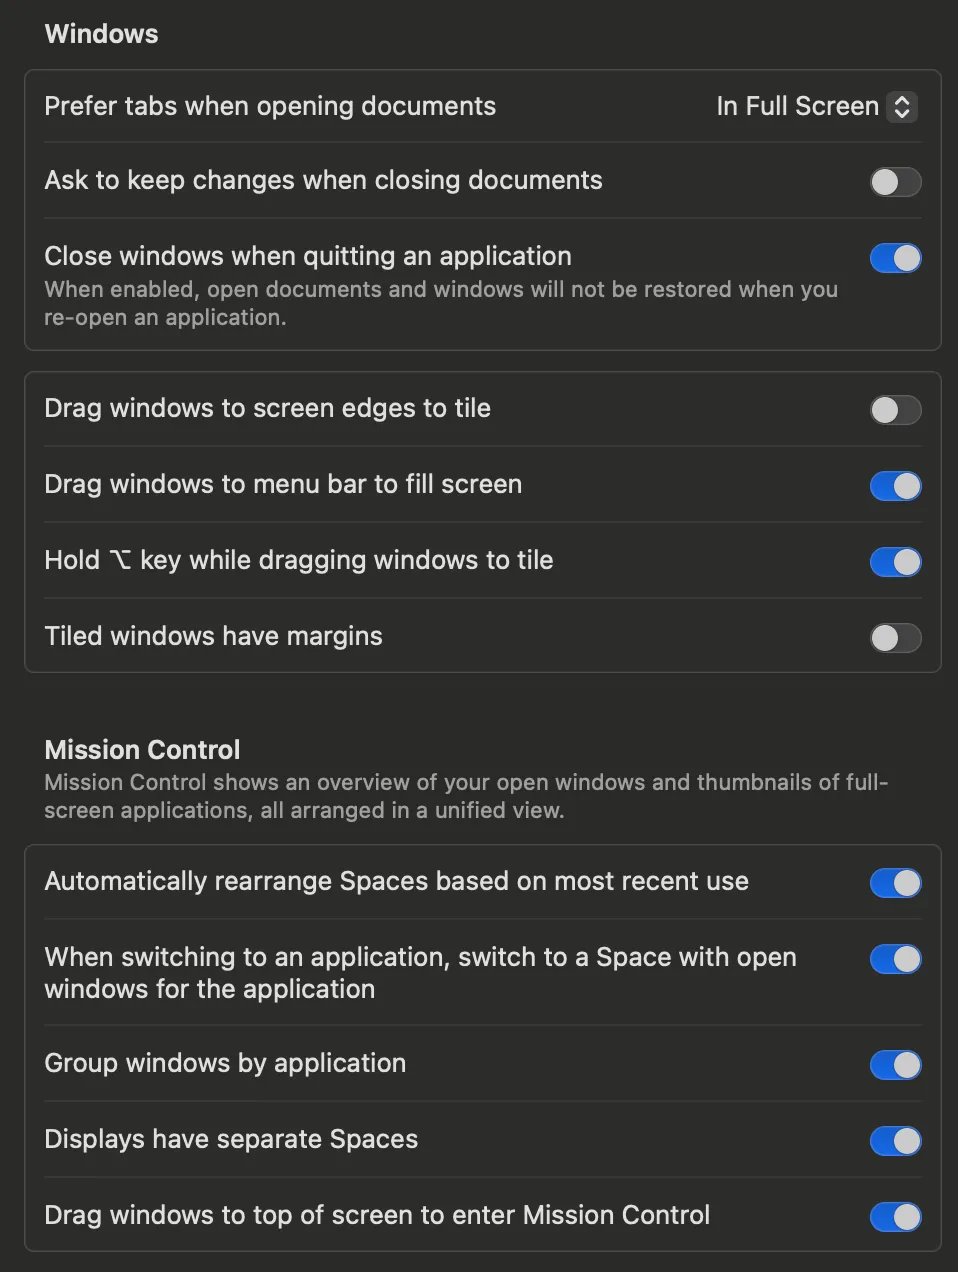
I turn on Hold ⌥ key while dragging windows to tile and turn off Tiled windows have margins
3.1.3 - Mission Control
I turn on Group windows by application
3.1.4 - Trackpad
I change the gesture for Mission Control to Swipe Up with Three Fingers
I turn on the gesture for App Exposé - Swipe Down with Three Fingers
3.1.5 - Keyboard Shortcuts
I customise a few of these and have adjusted as I use different devices. These are based on Apple’s older Magic Keyboard with Numeric Keypad and my Nuphy Air which don’t have a fn key in the bottom left, meaning I change the Window Management commands.
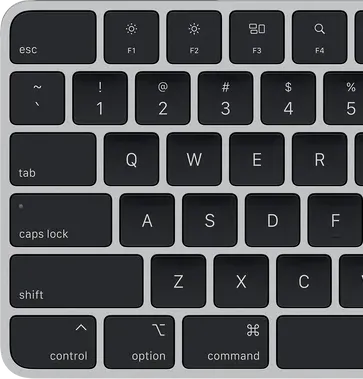
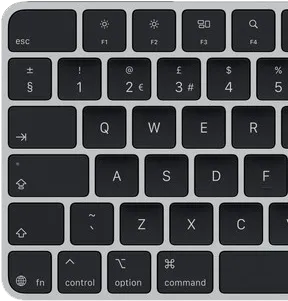
Honestly it seems like a small change but I wish they had done this ages ago, and I’m not getting a new keyboard just for this!
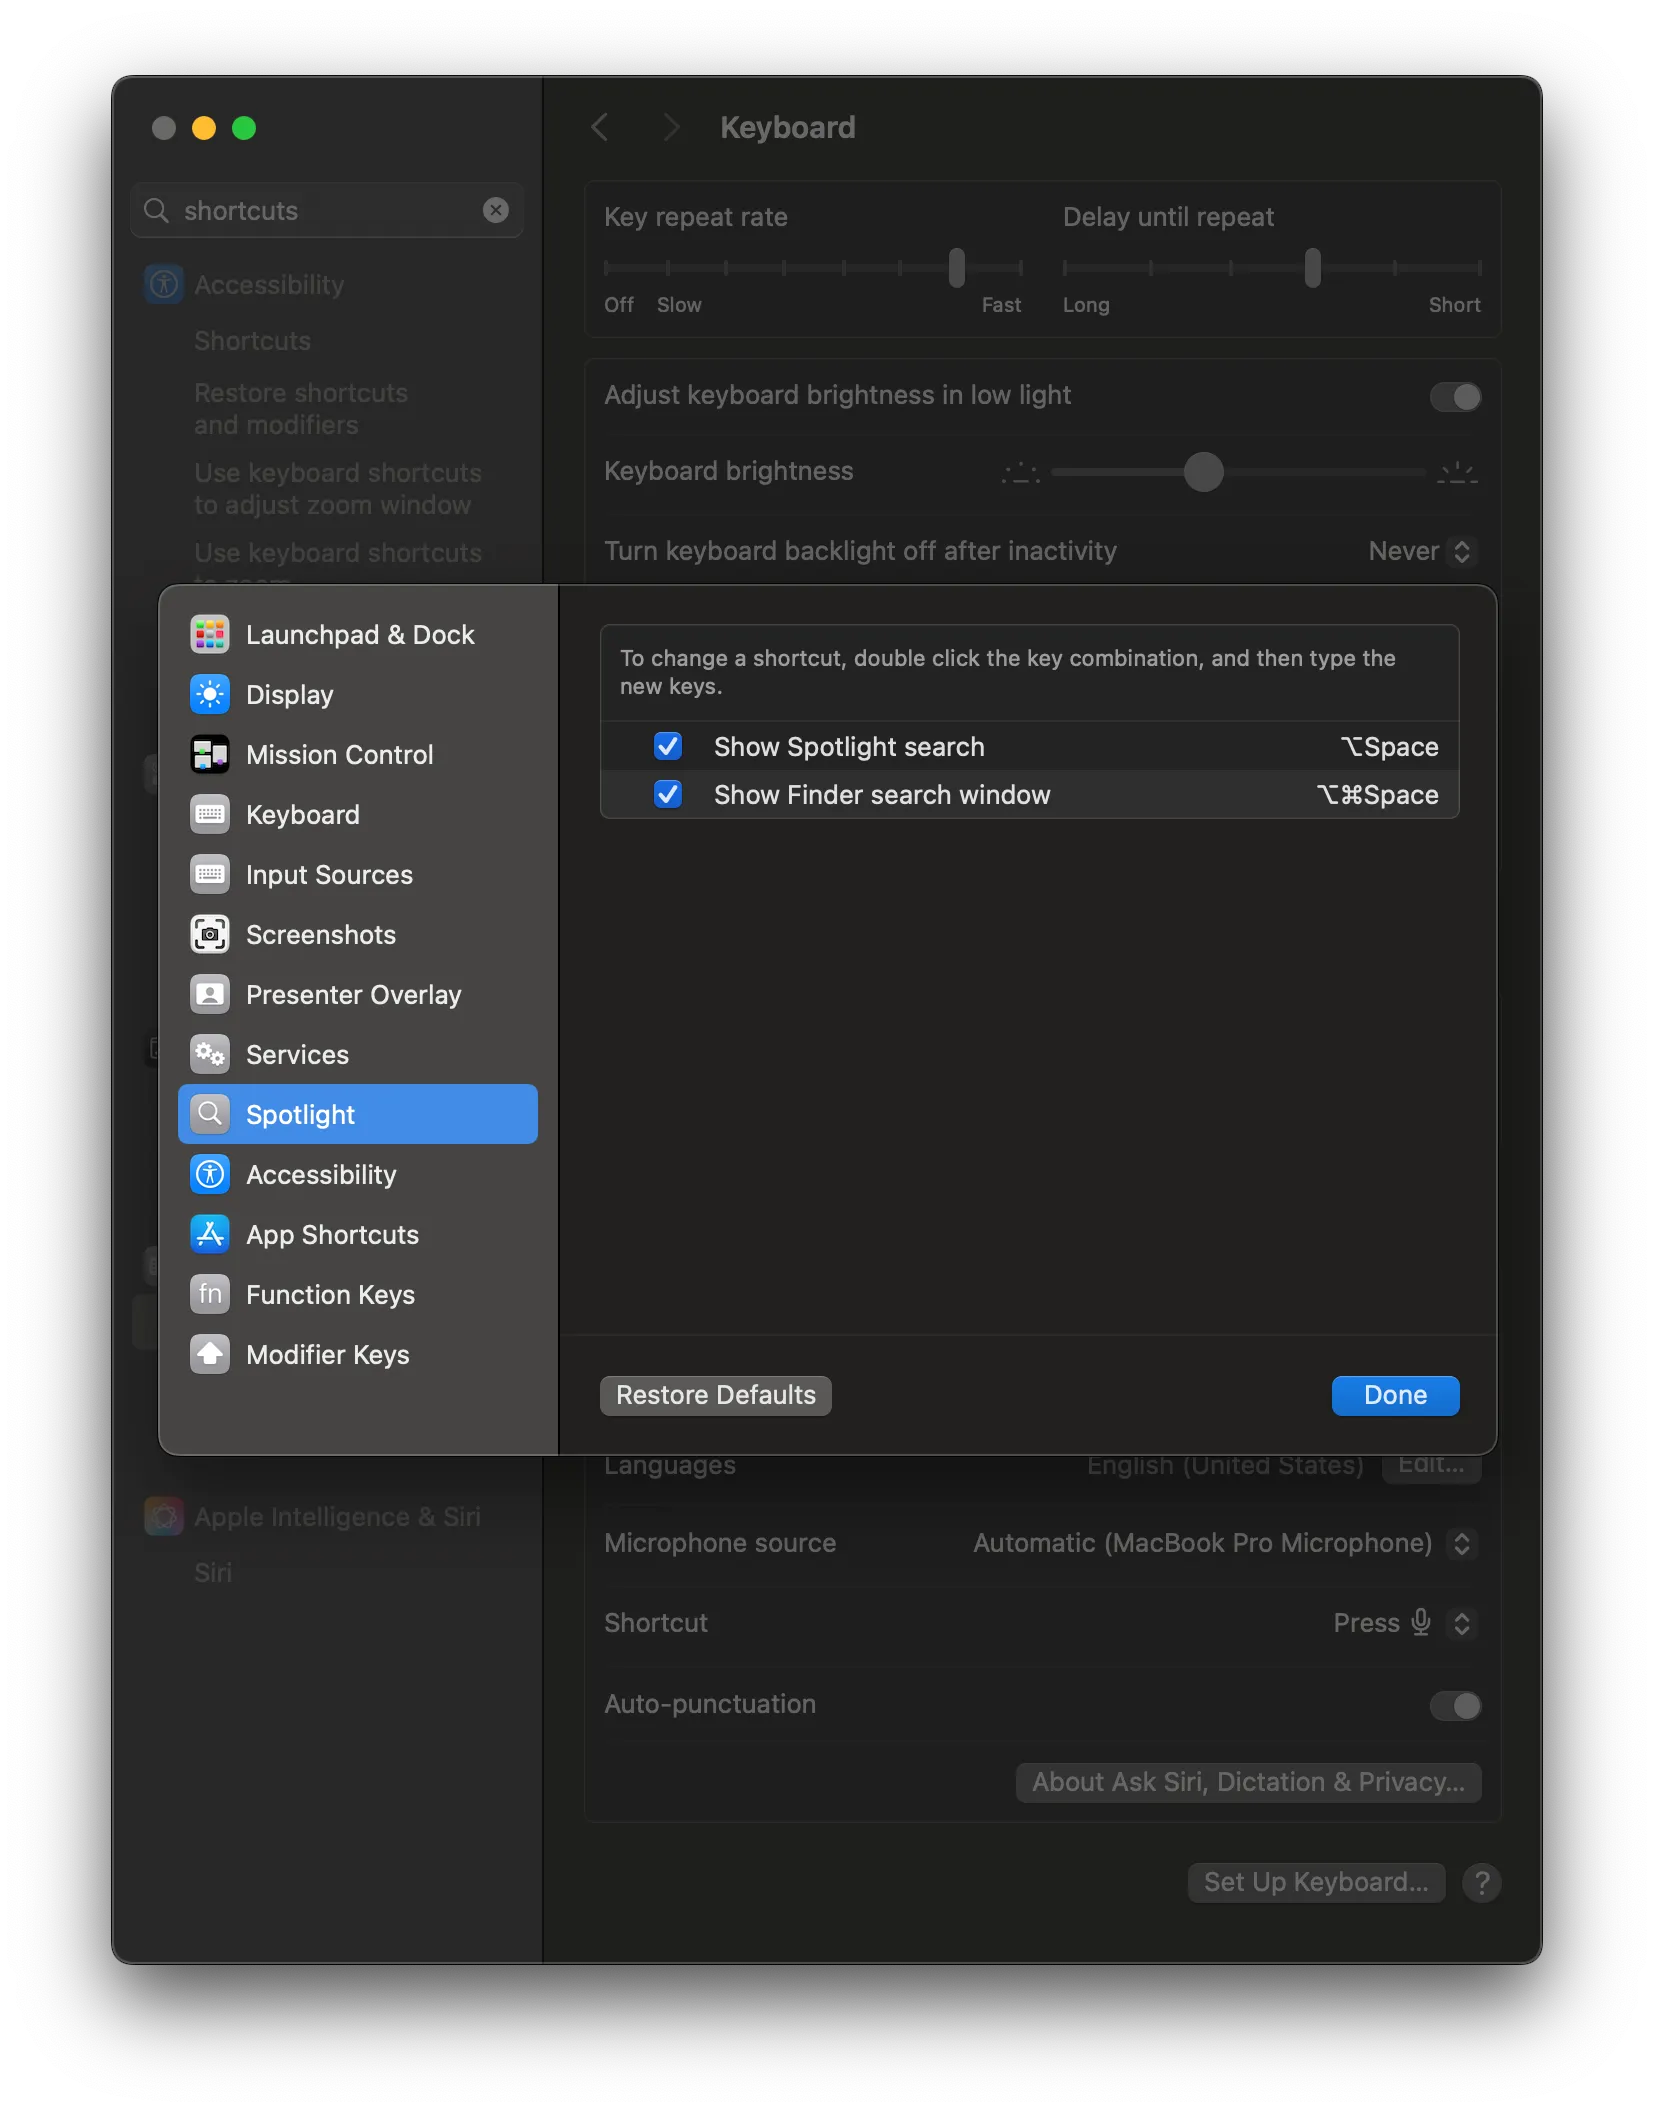
3.1.5.1 - Raycast and Window Management
I use Raycast instead of Spotlight , I change from ⌘ + Space to ⌥ + Space
I am a Hyper key stan! This allows you to use the Caps Lock key to press all four left modifier keys — ⇧ + ⌃ + ⌥ + ⌘ . I have set it up using Raycast , but I have set up window management using macOS’s built in functions:
General
Minimise
Zoom
Fill
Centre
Return to Previous Size
Halves
Tile Left Half
Tile Right Half
Tile Top Half
Tile Bottom Half
Quarters
Tile Top-Left Quarter
Tile Top-Right Quarter
Tile Bottom-Left Quarter
Tile Bottom-Right Quarter
Arrange
Arrange Left and Right
Arrange Right and Left
Arrange Top and Bottom
Arrange Bottom and Top
Arrange in Quarters
Full-Screen Tile
Full-Screen Tile Left
Full-Screen Tile Right
⌘M
none
⌃⌥⇧⌘F
⌃⌥⇧⌘C
⌃⌥⇧⌘R
⌃⌥⇧⌘←
⌃⌥⇧⌘→
⌃⌥⇧⌘↑
⌃⌥⇧⌘↓
[This is because they are in a square!]
⌃⌥⇧⌘U
⌃⌥⇧⌘I
⌃⌥⇧⌘J
⌃⌥⇧⌘K
[You may want to switch these with ‘Halves’]
⌃⌥⇧⌘A
⌃⌥⇧⌘D
⌃⌥⇧⌘W
⌃⌥⇧⌘S
⌃⌥⇧⌘/
none
none
3.1.5.2 - Screenshots
Since I use Shottr for screenshots, I change the Copy default to change it to the ‘Super’ modifier
e.g. ⇧ + ⌘ + 3 → ⇧ + ⌃ + ⌥ + ⌘ + 3
I also change the location of where screenshots get saved to my Downloads folder by using
defaults write com.apple.screencapture location ~/Downloads && killall SystemUIServerI also change the time for the screenshot preview in the native macOS screenshot utility to 15 seconds using:
defaults write com.apple.screencaptureui "thumbnailExpiration" -float 15 && killall SystemUIServersudo killall cfprefsd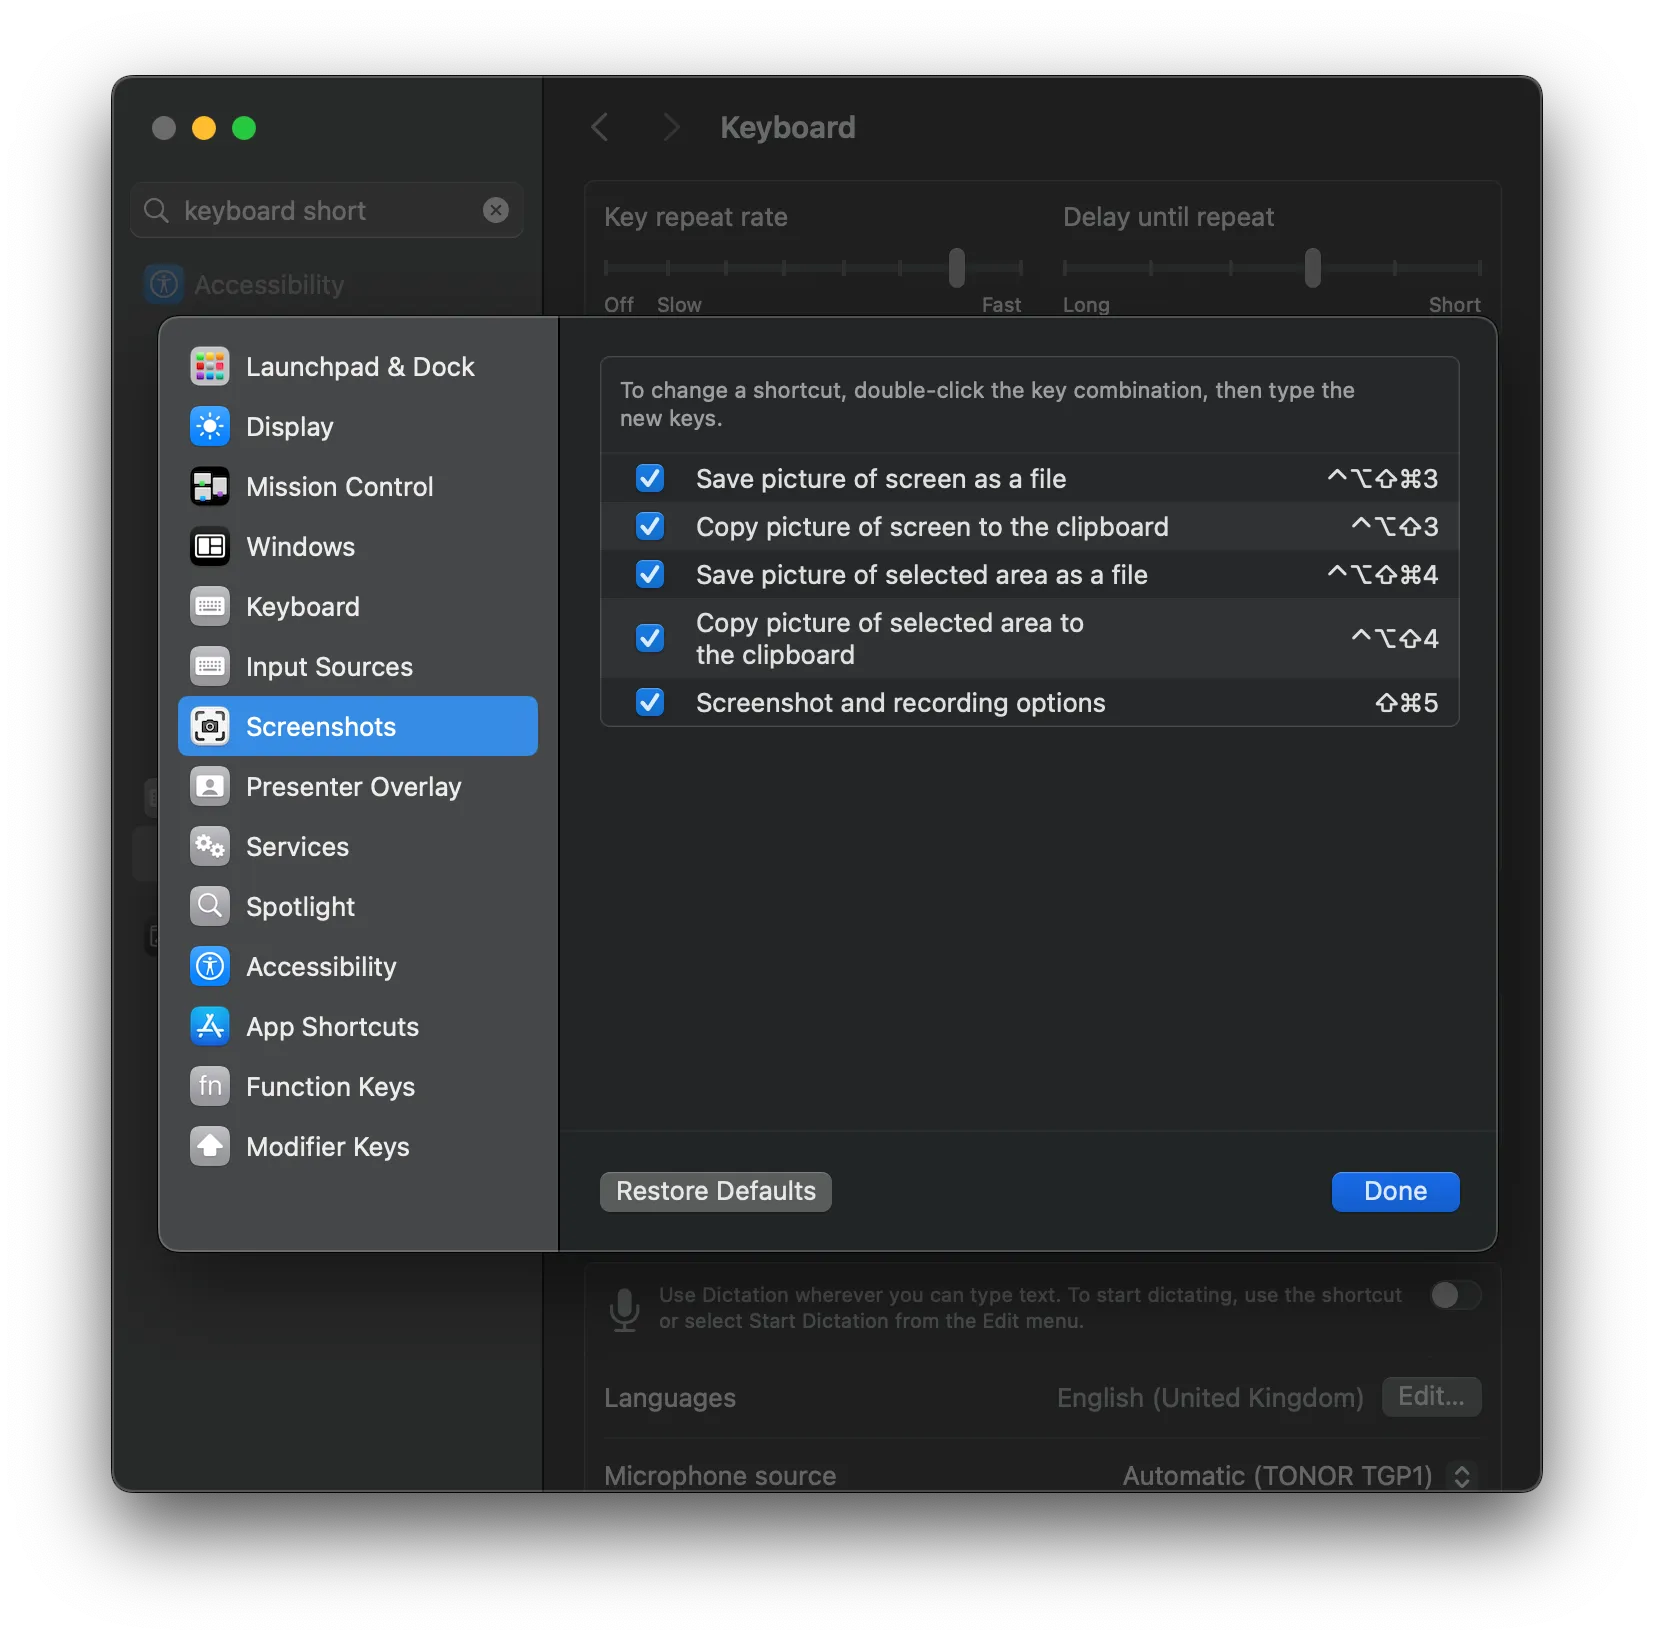
3.1.5.3 - Finder
I also really hate that ⌘ + R rotates in Finder — I expect it to rename (even though for individual items I use ↵ ). Instead it rotates everything! Urgh!
Finder
Rename
⌘R
3.1.5.4 - Freeform
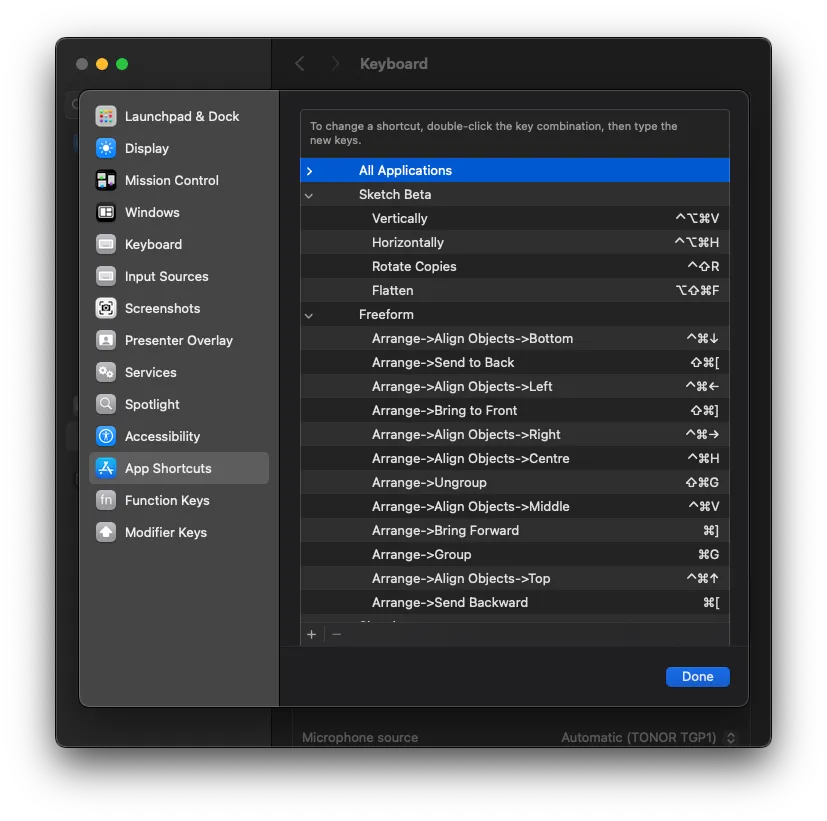
Though I don’t use it that much, I do like Freeform. I have a massive UI refs board (which really slows down any device I use it on 😅), but I am so used to my keyboard shortcuts that I need to replicate them here, so:
Freeform
Arrange->Align Objects->Bottom
Arrange->Send to Back
Arrange->Align Objects->Left
Arrange->Bring to Front
Arrange->Align Objects->Right
Arrange->Align Objects->Centre
Arrange->Ungroup
Arrange->Align Objects->Middle
Arrange->Bring Forward
Arrange->Group
Arrange->Align Objects->Top
Arrange->Send Backward
⌃⌘↓
⇧⌘[
⌃⌘←
⇧⌘]
⌃⌘→
⌃⌘H
⇧⌘G
⌃⌘V
⌘]
⌘G
⌃⌘↑
⌘[
-> in the shortcut’s name to identify lower levels 3.1.5.5 - Sketch (inc. Beta)
Sketch
Vertically
Horizontally
Rotate Copies
Flatten
⌃⌥⌘V
⌃⌥⌘H
⌃⇧R
⌥⇧⌘F
3.1.6 - Control Centre (and menu bar)
I ensure that Bluetooth is set to Show in Menu Bar — it doesn’t always show up here.
I also change Sound to Always Show in Menu Bar .
3.2 - Preinstalled Apps
3.2.1 - Finder
Finder is great but I always forget how much I have customised it until I move to new Mac that hasn’t been customised!
3.2.1.1 - Preferences
Finder’s sidebar is never used enough imo, so I open Finder, do ⌘ + , to open Preferences and:
- In
General, ensureSync Desktop & Documents foldersis checked since I want my Desktop and Documents to be synced via iCloud In
Sidebarselect everything (apart fromOn My Mac)On my Macs I also usually create 3 folders and add them to the sidebar:
- Github (to put all my Github repos)
- Exports (to put any assets I export)
- Screenshots (from Shottr or the built-in tool)
Better file management from the start means that I don’t spend as long looking for things later. My Downloads folder used to be where I dumped everything, but it’s easier to just be a bit stricter and organise as you go, rather than have a growing Downloads folder!
- In
AdvancedI select both options underKeep folders on top:and changeWhen performing a search:toSearch the Current Folder
3.2.1.2 - Other customisations
- I drag
DocumentsandDesktopfrom theiCloudsection in the Sidebar up to theFavouritessection above (this just makes much more sense for me) - I turn on the
Path Barby going toView>Show Path Bar In my
Downloadsfolder I set this up for how it best works for me:- I always want it to be sorted by
Date Last Added, so I set this for bothView>As IconsandView>As List - In
Listview I also addDate Modifiedas this can sometimes be useful
- I always want it to be sorted by
3.2.1.3 - In other apps
When you’re in other apps, the selection interface can be hard to use, especially with your Downloads folder which can often be shown in the Columns view. In this view, it sorts alphabetically and you can’t seem to find blank space to right click and sort by Date Last Added. To rectify this, change it to Icons, and you’ll be able to find space in-between documents to right click.
3.2.2 - Safari
I am not sure why, but Safari likes to default to open with a new window every time you start it up. I always change it to:Safari opens with: All windows from last session
3.2.3 - Dock
We already talked about the Dock settings before, but I like to separate out the items on my Dock using spacers. There are two types of spacer, small and regular. Regular is the same size as a full app, whereas small is half the width. I use small spacers.
To add these, you have to run the corresponding command in Terminal. Sometimes this doesn’t work, so re-run it until it adds one. Once one is added, drag and position it before adding another — the success rate of adding another seems to go up if you drag the one you just added away.
The commands to add spacers are as follows:
3.2.3.1 - Small spacer
defaults write com.apple.dock persistent-apps -array-add '{"tile-type"="small-spacer-tile";}'; killall Dock3.2.3.2 - Large spacer
defaults write com.apple.dock persistent-apps -array-add '{"tile-type"="spacer-tile";}'; killall Dock3.2.4 - Terminal
I found this recently, but for sudo commands instead of typing your password, you can enable TouchID for authentication! To do this:
Create a local PAM configuration file (this persists across macOS system updates):
sudo cp /etc/pam.d/sudo_local.template /etc/pam.d/sudo_localOpen it in an editor:
sudo nano /etc/pam.d/sudo_localRemove the
#before the line:auth sufficient pam_tid.soSave and exit (
⌃ + O,Enter, then⌃ + X).
3.3 - Replacing default macOS functions
3.3.1 - Raycast
I prefer Raycast to Spotlight — it has many more functions and I can customise it more. I am by no means a power user, but I have adjusted it so that it works for me.
3.3.1.1 - Extensions
Raycast has a Store which allows you to install Extensions which can run functions on your Mac, both system and app-specific. When I first started using Raycast, I ended up adding loads and loads of extensions, and both forgetting about functions, and also being overwhelmed when I searched for a function. There a few ways I have combatted this:
- I only install Extensions I will actually use
This seems simple, but I am definitely an optimistic downloader. I have tamed this somewhat. If I am browsing the Store, I carefully check my own workflow to identify if I think an extension would actually make sense (do I use this function commonly? Would I actually think to use Raycast rather than a web app?). - I only enable the parts of the Extensions that I want
This is something I didn’t really think about properly until recently, but this actually made my menus much less overwhelming. In theExtensionstab, I go through and expand each Extension and uncheck all the Commands which duplicate other functionality, or I just don’t want. - I add Aliases
See the below section, I think these are great!
Below I have written out the Extensions I have installed, and the Commands I have enabled for each of them, often slimmed down significantly (if you search for them in the Store, lots have a lot more than the number I have enabled!). Any spaces have been shown as underscores (_). I have added a ⭐ next to any I use a lot.
| Extension Name | Commands Enabled | Command Alias |
|---|---|---|
| Apple Maps Search | Search Maps | - |
| Arc | Open New Little Arc Window Search Tabs | little_arc arc_search |
| Bitwarden Vault | Generate Password ⭐ Search Vault | - bw |
| Brew | Clean Up Search Show Installed Show Outdated Upgrade | ---- brew_upgrade |
| Calendar | My Schedule | sch |
| Change Case | - | case |
| Clipboard History | - | clip |
| Coffee | ⭐ Caffeinate Caffeinate For Caffeinate While ⭐ Decaffeinate | caf caf_for caf_while decaf |
| Color Picker | Color Names Convert Color Pick Color | colour_ _name colour_conv colour_picker |
| Convert Unit | Web Converter | conv |
| Define Word | - | def |
| Google Search | - | google |
| Kill Process | - | - |
| Link Cleaner | - | link_clean |
| Music | Add to Library ⭐ Next Track ⭐ Pause Play Previous Track | - next pause play back |
| Navigation | Search Menu Items Switch Windows | - - |
| Notion | Search Notion | notion_search |
| Quicklinks | Export Quicklinks Import Quicklinks | - - |
| Raycast | Confetti Manage Fallback Commands Quit Raycast Refresh Apps and Settings Reset Raycast Window Position Run Last Command Search Quicklinks Store Walkthrough | ---- - - - extensions - |
| Raycast Settings | Al About Account Advanced Cloud Sync Extensions General Organizations | ---- - - - - |
| Ruler | - | - |
| Screenshot | All in One Capture Area Capture Screen Capture Timer Capture Window Capture Window To Clipboard Capture and Annotate Capture to Clipboard | - - cap_s - cap_w - - - - |
| Screenshots | Paste Recent Screenshot<br>Search Screenshots | - - - |
| Search Browser Tabs | - | browser |
| Search Device | - | - |
| Search Emoji & Symbols | - | emoji |
| Search Files | - | - |
| Shortcuts | - | - |
| Snippets | Create Snippet Export Snippets Import Snippets Search Snippets | - - - - |
| System | Empty Trash Lock Screen ⭐ Quit All Applications Set Volume to 0% Shut Down | - - quit_all vol_0 - |
| Translate | - | - |
| View 2FA Codes | - | 2fa |
| Webpage to Markdown | - | webpage_ _markdown |
| Wifi Password Reveal | - | wifi_reveal |
| Window Management* | Bottom Half Bottom Left Quarter Bottom Right Quarter Left Half Maximize Top Half Top Left Quarter Top Right Quarter | b b, b. , fs t t, t. |
*I also have some of these set up with hotkeys (see 3.1.5 Keyboard Shortcuts above).
3.3.1.2 - Aliases
Adding Aliases actually was actually a game-changer. These allow you to assign characters to Extension (which includes each app), meaning when you type these, Raycast suggests this first. This even works if you haven’t typed the whole of the Alias, suggesting it above the default search.I now have double or triple letter Aliases set so I can quickly launch them.
These are also good for when something has been renamed, or if you can’t remember the name of something but can remember its function (or want to group applications by function). For example I have Terminal set to term and Warp set to term2, and X set to twi.
I have the Extensions Aliases above, but for apps specifically I have:
| App Name | Alias |
|---|---|
| Adobe Acrobat | acrobat |
| Adobe Illustrator | il |
| Adobe InDesign | id |
| Adobe Lightroom | lr |
| Adobe Media Encoder | media_enc |
| Adobe Photoshop | ps |
| Adobe Premiere Pro | premiere |
| App Store | app |
| App Cleaner | clean |
| Arc | arc |
| Blender | blend |
| Bluesky | bs |
| Calendar | cal |
| ChatGPT | ch |
| Figma | fig |
| Final Cut Pro | fcp |
| Firefox | ff |
| ImageOptim | img |
| Keynote | key |
| Logic Pro | lp |
| Messages | msg |
| Messenger | fb_messenger |
| Microsoft Excel | excel |
| Microsoft PowerPoint | powerpoint |
| Microsoft Teams | teams |
| Microsoft Word | word |
| Music | music |
| News | news |
| Notes | notes |
| Notion | notion |
| Numbers | numbers |
| Pages | pages |
| Perplexity | pp |
| Photos | photos |
| Podcasts | podcasts |
| QuickTime Player | qt |
| Safari | saf |
| Simulator | sim |
| Sketch | sk |
| Sketch Beta | skb |
| Slack | sla |
| System Settings | pref |
| Terminal | term |
| TextEdit | te |
| Visual Studio Code | vsc |
| Warp | term2 |
wa | |
| X | twi |
| Zen Browser | zen |
3.3.1.3 - Quicklinks
Quicklinks allow you to search quickly from Raycast and go straight to your browser (or even certain apps if they support it). Icons are usually automatically populated by Raycast which is great. You can also assign Aliases to these. Currently I have:
| Name | Alias | Link |
| Amazon | amz | https://www.amazon.co.uk/s?k={Query} |
| ChatGPT | chat | https://chatgpt.com?hint=search&q={query} |
| Google Translate | trans | https://translate.google.com/?sl={argument name="source language" default="auto"}&tl={argument name="target language"}&text={argument name="word"}&op=translate |
| Open Desktop | dsk | ~/Desktop |
| Open Documents | doc | ~/Documents |
| Open Downloads | dow | ~/Downloads |
| Open Root | root | ~/ |
| Perplexity | per | https://www.perplexity.ai/search?copilot=true&q={query} |
| Search Dribbble | drib | https://dribbble.com/search/{argument} |
| Search DuckDuckGo | duck | https://duckduckgo.com/?q={argument} |
| Search Google | gs | https://google.com/search?q={argument} |
| Search Unsplash | uns | https://unsplash.com/s/photos/{argument} |
| Search YouTube | yt | https://www.youtube.com/results?search_query={argument} |
You can add links directly to folders on your Mac. To do this:
- Find the folder you want in Finder
- Hold down
⌥and clickEditthen selectCopy ”Folder Name” as Pathname(or use the keyboard shortcut⌥+⌘+C) - You will now have a pathname. You just need to remove
/Users/youruserand replace this with~/e.g. for the Music folder it goes from/Users/youruser/Musicto~/Music - Now just use this as your link in Raycast and name accordingly!
My full Raycast settings are exported in Raycast 2026-11-02.rayconfig in the mac-setup repo (password-protected). Import it in Raycast → Settings → Advanced → Import, then enter the export password.
3.2.2 - BetterSnapTool
I use BetterSnapTool for setting up custom snap areas. I first used this for my monitor which I have rotated 90°, but have since created 1/4 and 1/3 snap areas for my 4k monitors when I need to reference a few things at once.
If you previously had some preferences you should back them up
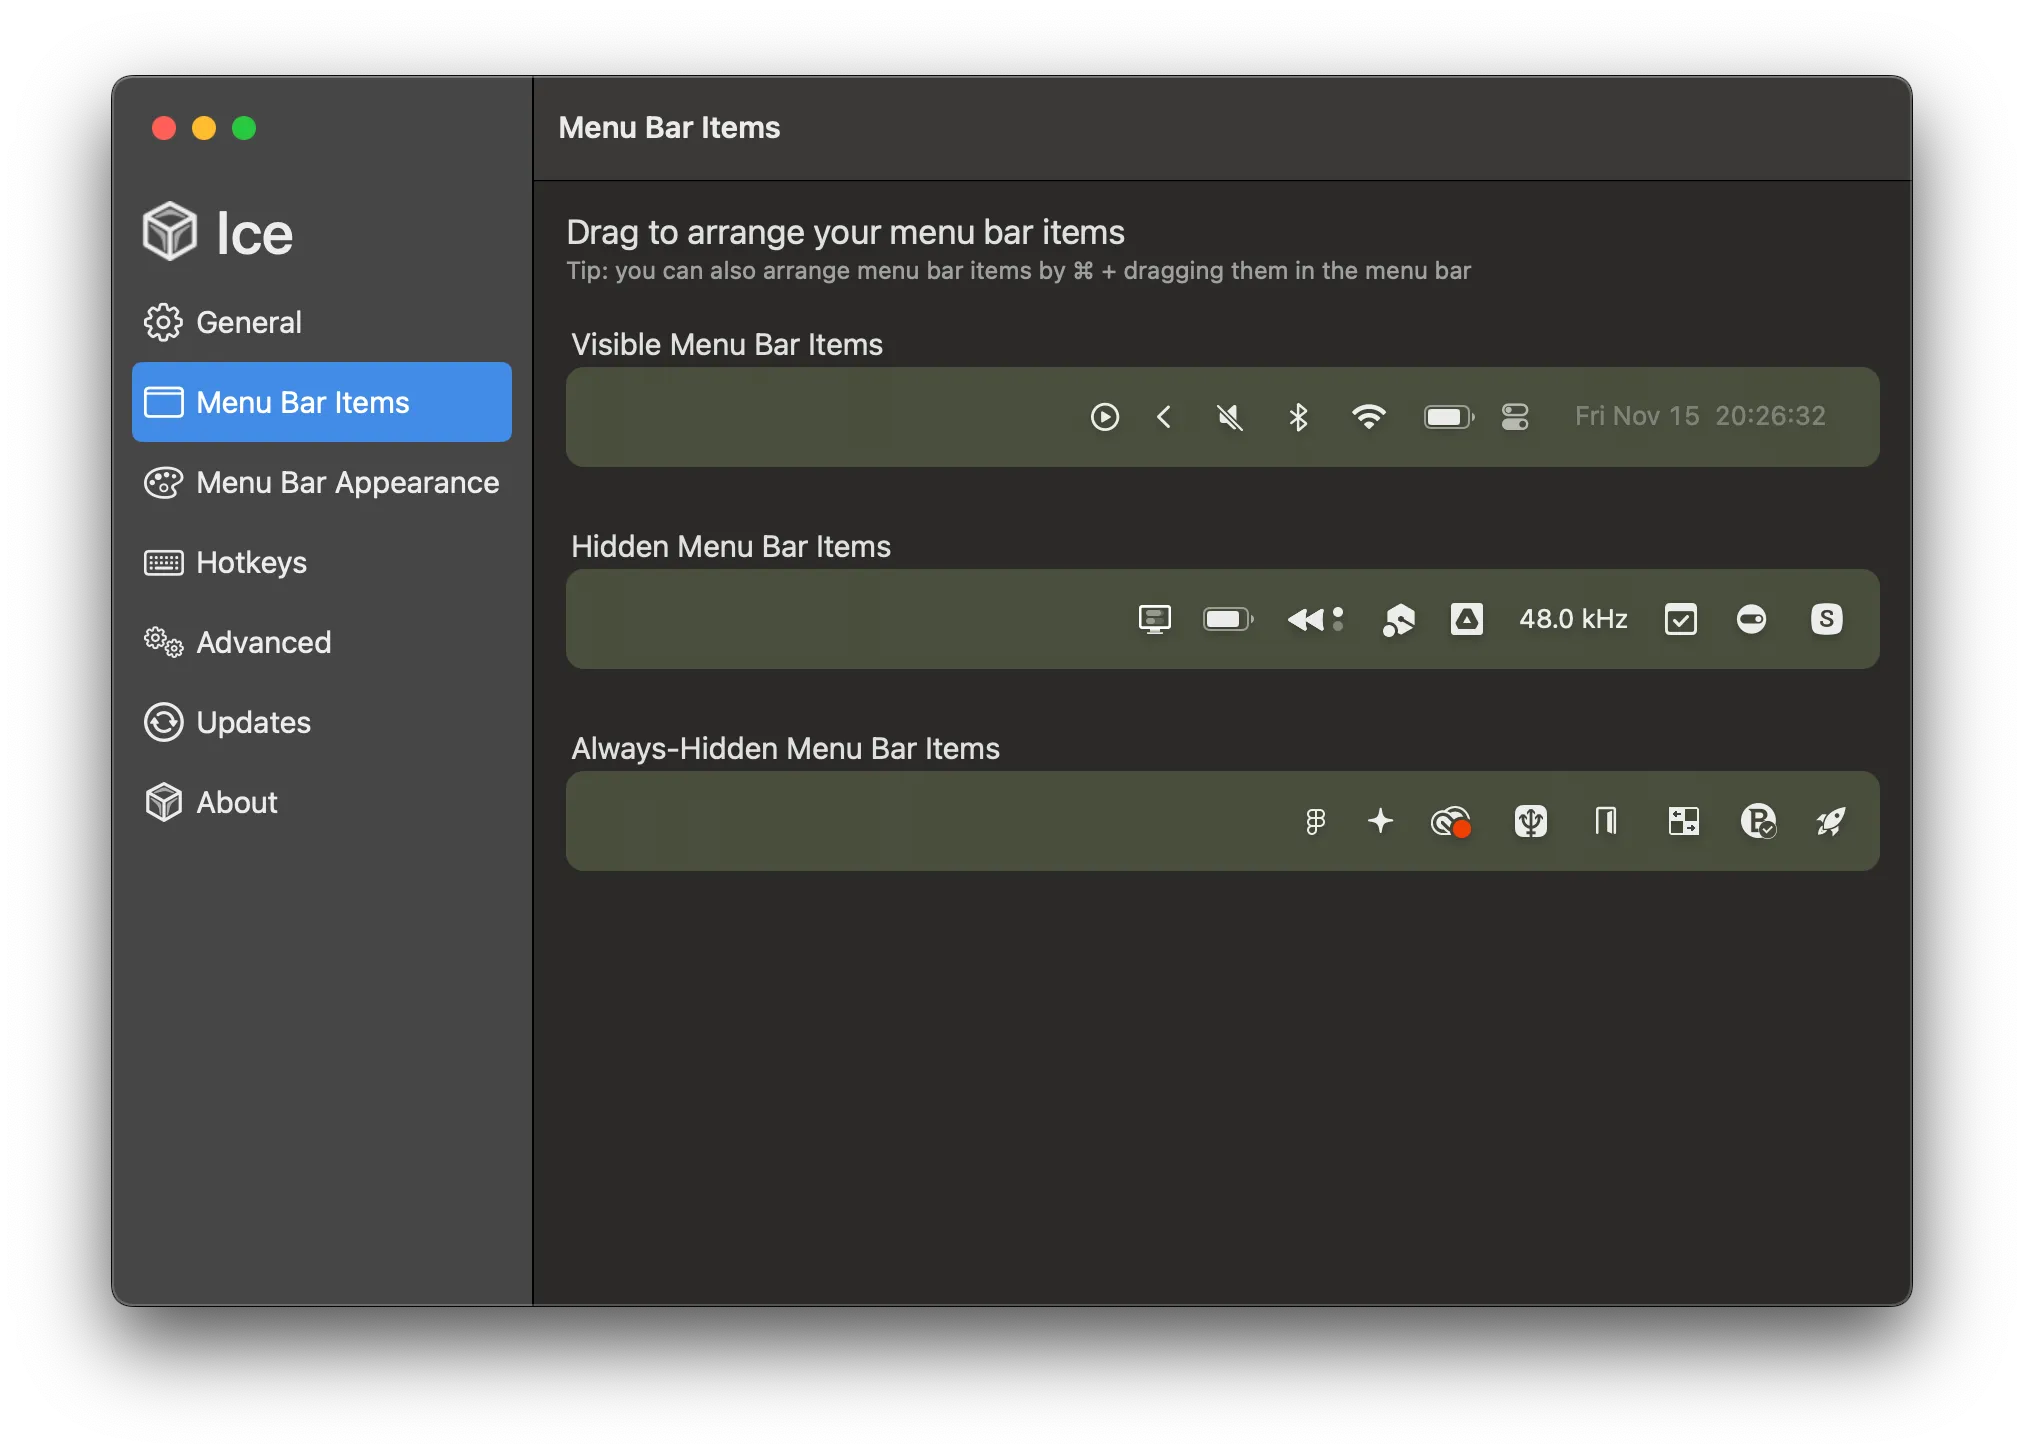
3.2.2 - Ice — replaced by Thaw (November 2026)
To tidy up my menu bar I use Ice, where I place things is as follows:
3.2.3 - Shottr
I use Shottr instead of macOS’s built in screenshot utility. I prefer that it allows you to mark up, edit, crop, measure, and more!
It also has a super useful OCR feature which allows you to select an area on the screen and extract the text from it.
Since I want it to replace the default screenshots in macOS, I set it up to:
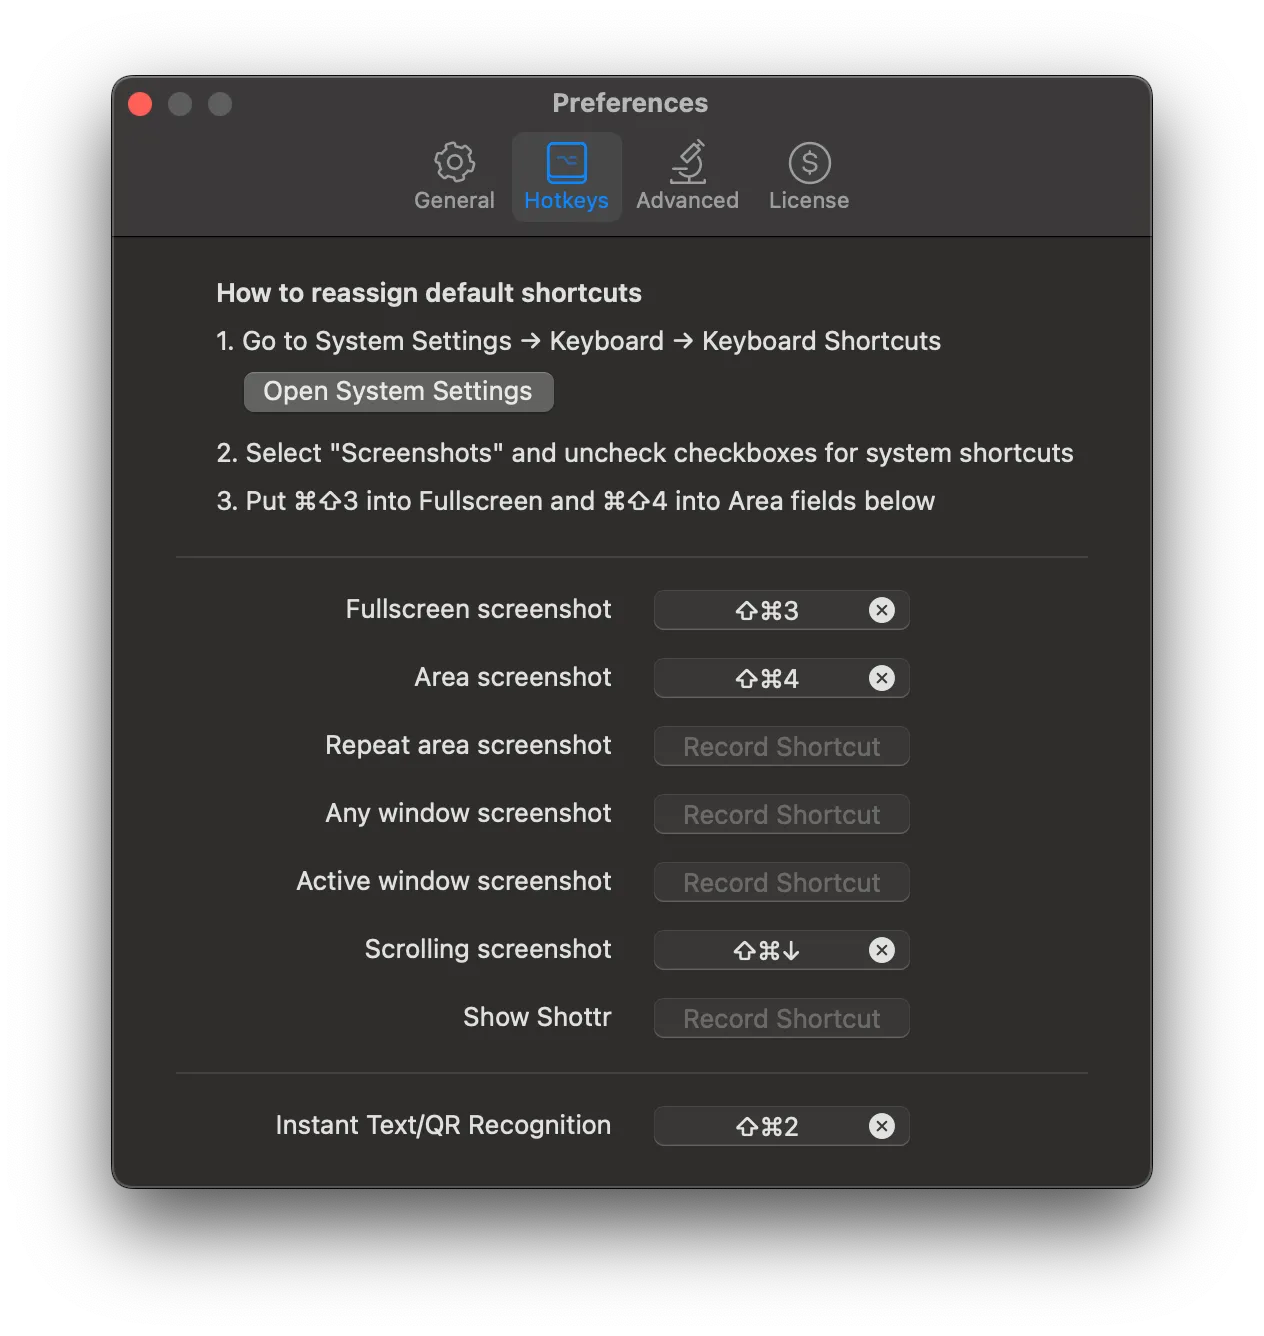
| Fullscreen screenshot | ⇧ + ⌘ + 3 |
| Area screenshot | ⇧ + ⌘ + 4 |
| Scrolling screenshot | ⇧ + ⌘ + ⬇︎ |
| Instant Text/QR Recognition | ⇧ + ⌘ + 2 |
3.2.4 - Velja
I use Velja to automate switching to Arc for Google apps. They are as follows:
| Name | Google Docs |
|---|---|
| Open in: | Arc |
| Sample URL: | https://docs.google.com |
| Detect via: | Domain |
| Match: | docs.google.com |
| Source Apps: | Slack Arc Mail Calendar |
| Name | Google Meet |
|---|---|
| Open in: | Arc |
| Sample URL: | meet.google.com |
| Detect via: | Domain |
| Match: | meet.google.com |
| Source Apps: | Notion CalendarRewindArcSlackMailCalendar |
| Name | Google Drive |
|---|---|
| Open in: | Arc |
| Sample URL: | https://www.drive.google.com/ |
| Detect via: | Domain |
| Match: | drive.google.com |
| Source Apps: | No Source Apps |
| Name | Google Calendar |
|---|---|
| Open in: | Arc |
| Sample URL: | https://calendar.google.com/ |
| Detect via: | Domain |
| Match: | calendar.google.com |
| Source Apps: | No Source Apps |
| Name | Jira |
|---|---|
| Open in: | Arc |
| Sample URL: | https://atlassian.net/ |
| Detect via: | Domain |
| Match: | atlassian.net |
| Source Apps: | No Source Apps |
| Name | Harvest |
|---|---|
| Open in: | Arc |
| Sample URL: | https://harvestapp.com/ |
| Detect via: | Domain |
| Match: | harvestapp.com |
| Source Apps: | No Source Apps |
| Sample URL: | https://getharvest.com/ |
| Detect via: | Domain |
| Match: | getharvest.com |
| Source Apps: | No Source Apps |
3.2.5 - Rocket (Emojis)
I prefer typing a : and searching to insert emoji. Rocket does this really well. I hide the Menu Bar icon using Ice.
3.4 - System Enhancements
3.4.1 - DockDoor — no longer used (November 2026)
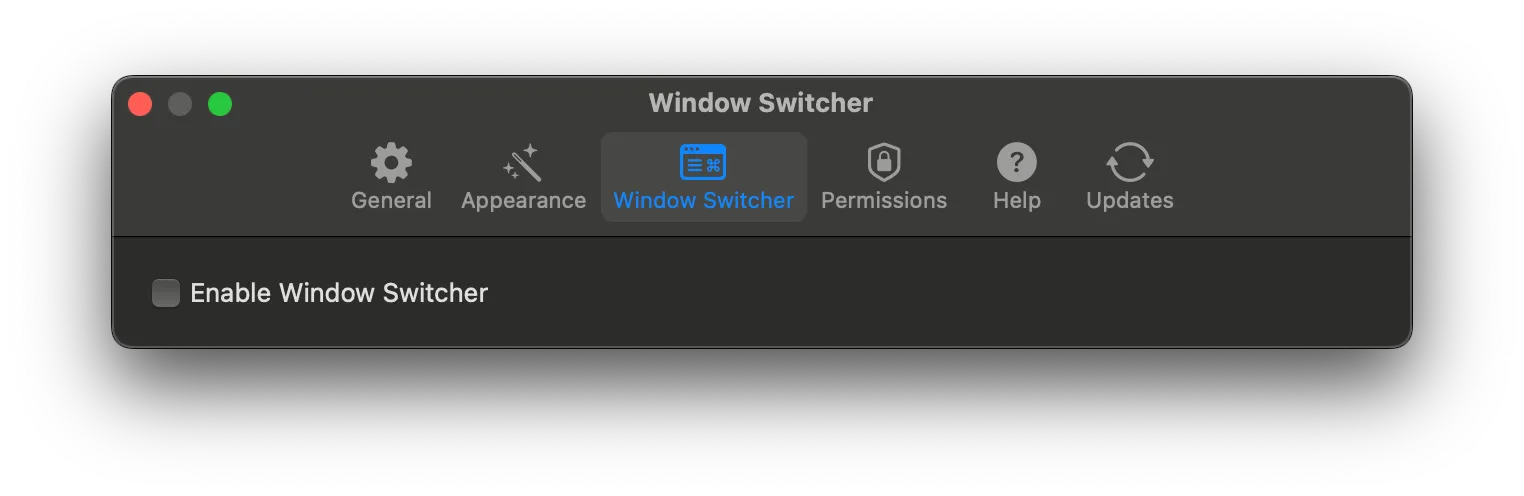
DockDoor shows you a preview of the windows you have open when you hover over them in the Dock.
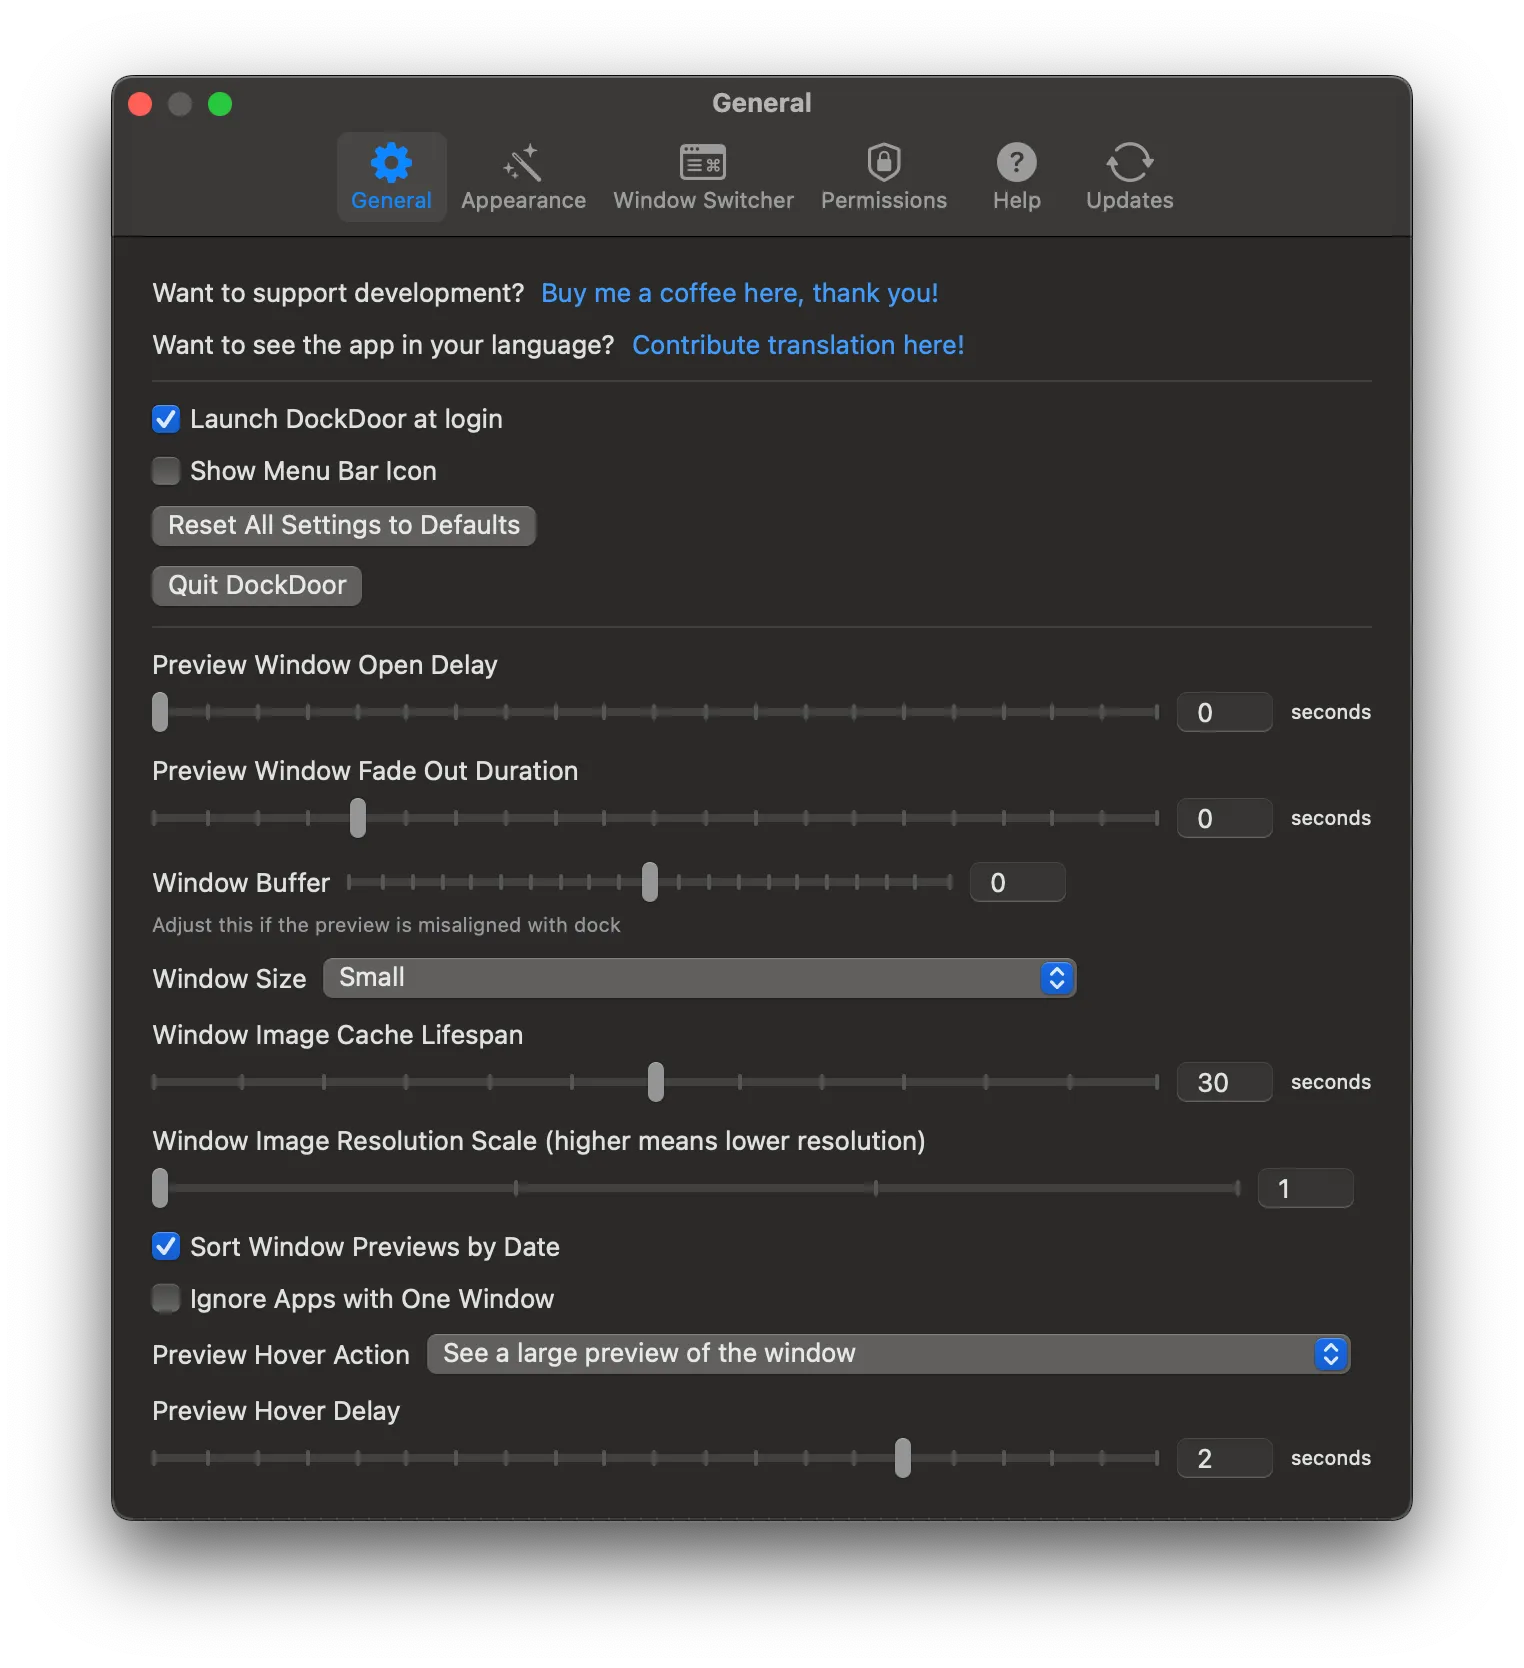
I prefer it to be clean, quick and launch on login, so I change:
In General:
- I check
Launch DockDoor at login Preview Window Open Delay>0Window Size>Small
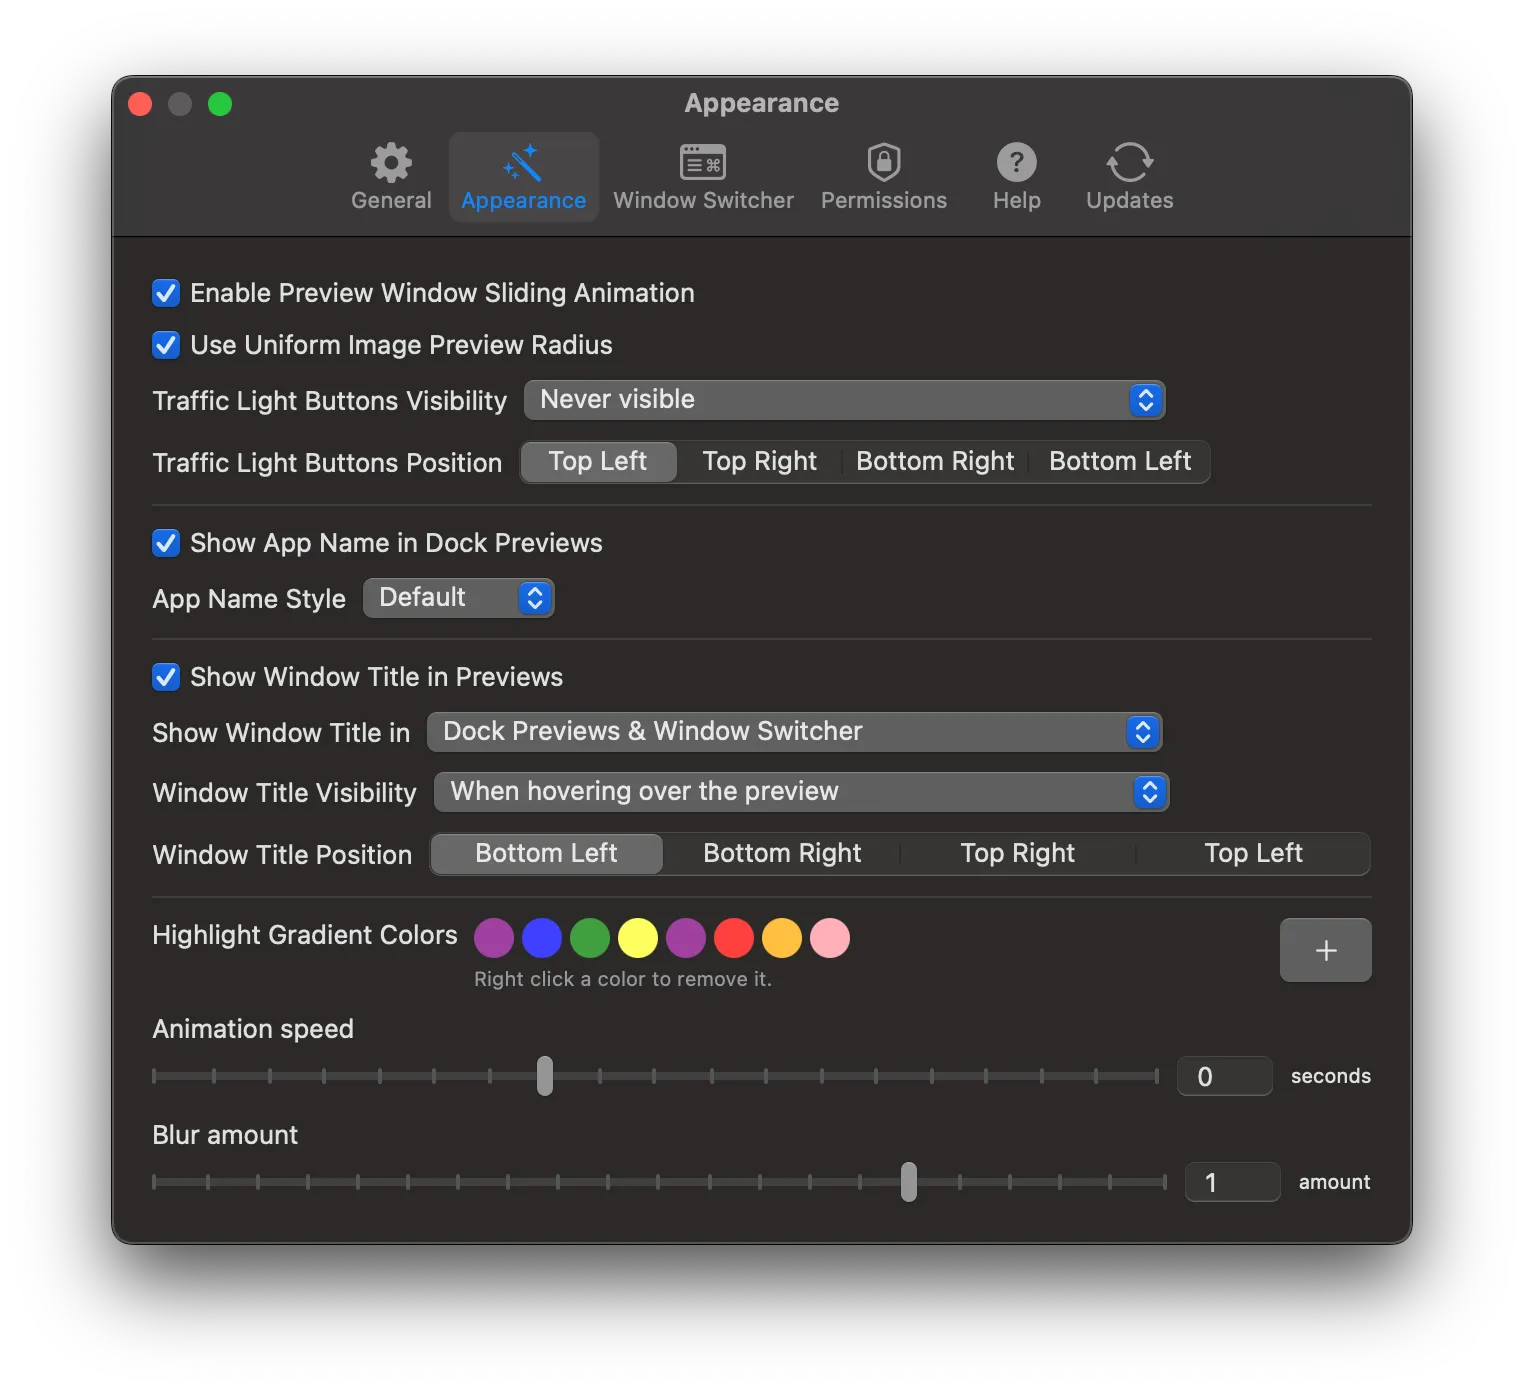
In Appearance:
Traffic Light Buttons Visibility>Never visible
In Window Switcher:
- I uncheck
Enable Window Switcher
3.4.2 - Boring Notch — no longer used (November 2026)
Boring Notch is a great app and has loads of functionality to make your notch more useful on MacBooks. They added the feature I really wanted — being able to assign this to only your MacBook screen when connected to external monitors.
I change a few settings:
General
Menubar icon [Off]
Launch at login [On]
Show on all displays [On]
Show on a specific display [Built-in Retina Display]
Automatically switch displays [Off]
Appearance
Always show tabs [Off]
Settings icon in notch [Off]
Calendar
Show calendar [Off]
3.5 - Utilities
These are other utilities I use that aren’t necessarily tied to system functions, but things I install, and set to open on login (they are automatically downloaded in the packages.txt and mas-apps.txt).
3.5.1 - AutoSwitch — no longer used (November 2026)
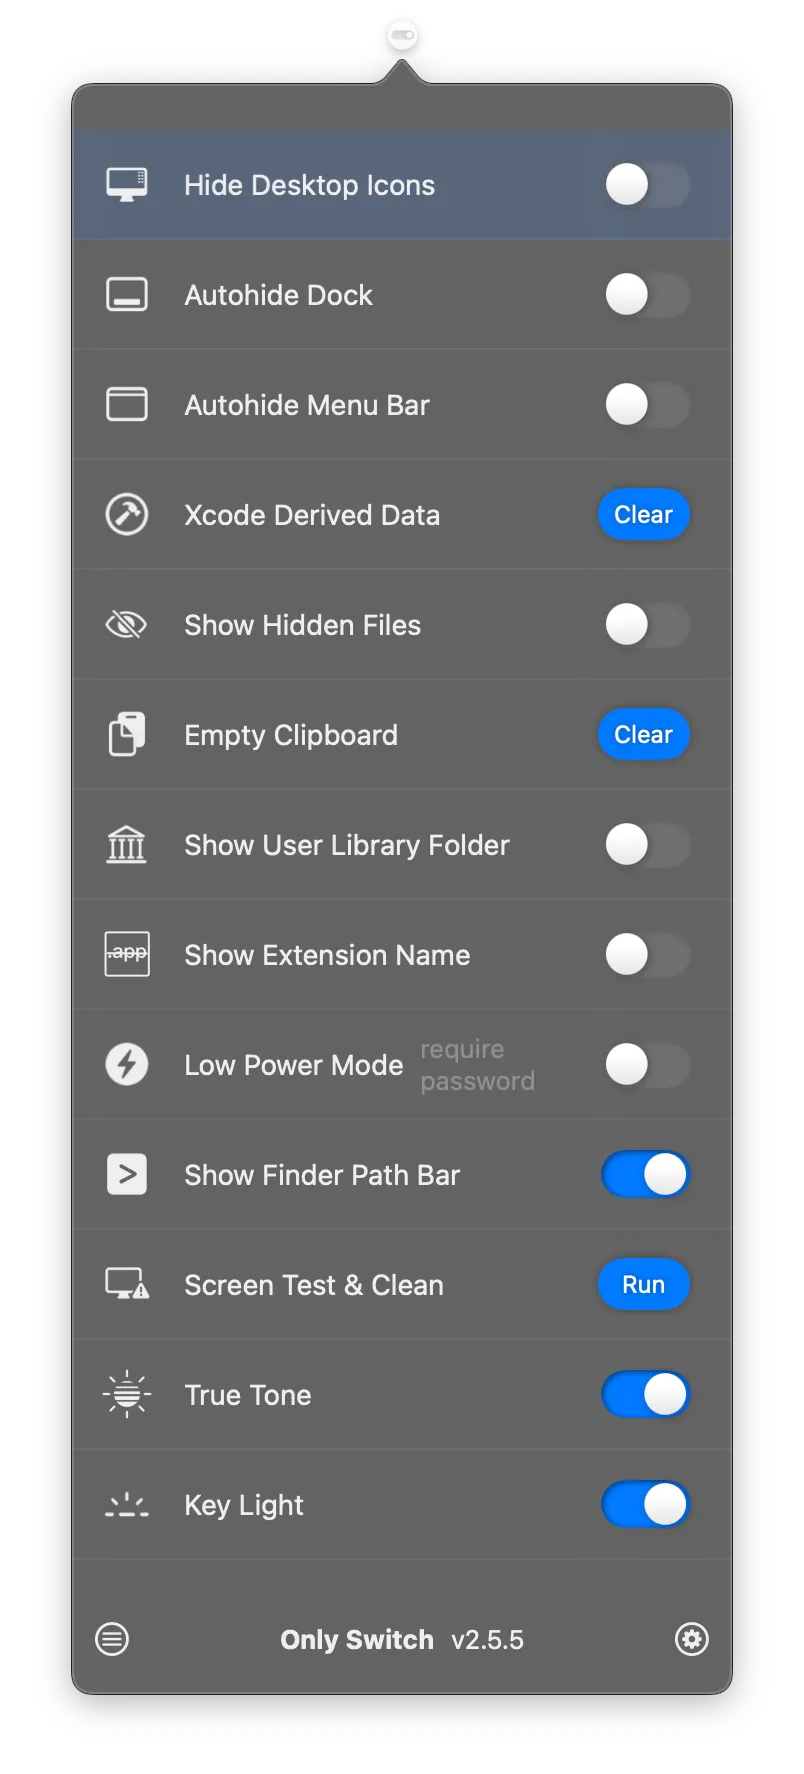
I like to use AutoSwitch as secondary menu to quickly access some advanced settings.
In General I set:
Launch:Launch at logintoOnPromotion:Show More AppstoOff
In Customisation I turn on:
Hide Desktop IconsAutohide DockAutohide Menu BarXcode Derived DataShow Hidden FilesEmpty ClipboardShow User Library FolderShow Extension NameLow Power ModeShow Finder Path BarScreen Test & CleanTrue ToneKey Light- In here I also turn off
Hide Menu Bar Icons
3.5.2 - MeetingBar — no longer used (November 2026)
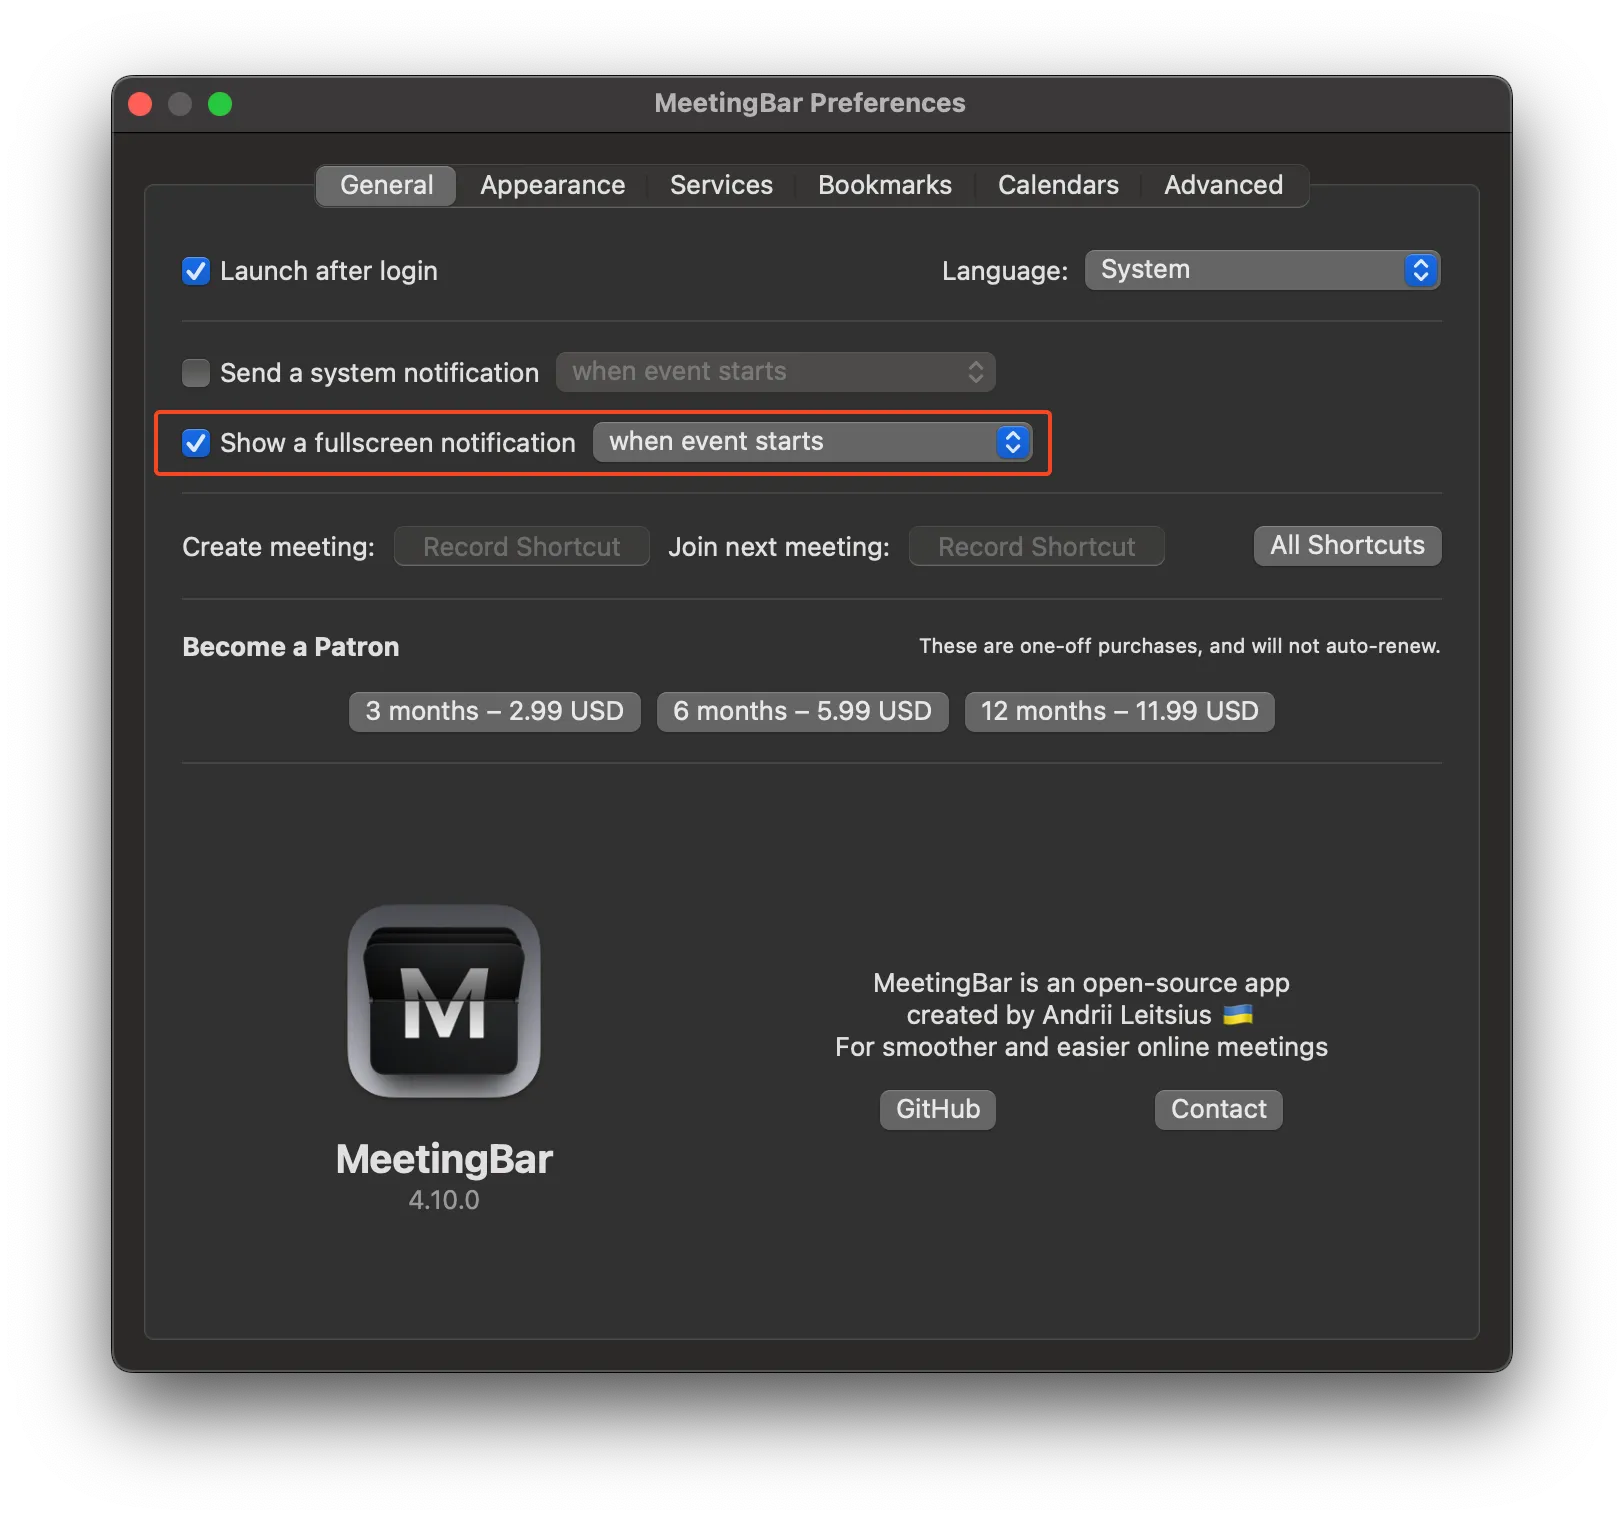
I use MeetingBar only for a single function, it shows a fullscreen notification when a meeting starts, meaning I can’t ignore it.
I therefore check Launch after login and Show a fullscreen notification when event starts.
I turn off basically everything else and hide it in my menu bar using Ice.
3.5.3 - Lossless Switcher — no longer used (November 2026)
This ensures you’re always streaming the best quality when connected to AirPods or other Bluetooth headphones. In the Menu Bar, click the icon to see its settings. I like to have it in the hidden menu in Ice with Show Sample Rate selected so I can keep an eye on it.
3.5.4 - Amazon Q — no longer used (November 2026)
This is a great autocomplete for Terminal, but by default it shares a lot of data with Amazon. Log in and then select the icon in the Menu Bar → Settings. Then under Settings →Preferences →Advanced, turn off Share Amazon Q content with AWS and Telemetry.
3.5.5 - AdGuard for Safari — no longer used (November 2026)
I don’t generally block ads, but I prefer not to be tracked, and don’t like the popups on websites, including cookie notices. I therefore turn on:
Privacy, withAdGuard Tracking Protection filterandPeter Lowe's BlocklistAnnoyances, withAdGuard Annoyances filter
I also turn off Show AdGuard for Safari in the menu bar
3.5.6 - NepTunes
This is much better than the Last.fm app, for scrobbling. You just need to log in and grant access to your play history.
Also I disable the widget (Widget, uncheck Show widget).
3.5.7 - Apparency — no longer used (November 2026)
This is a good app to have just so you can see all the details of any app on your system in one place.
3.5.8 - Syntax Highlight — no longer used (November 2026)
This is a Quick Look Extension to previewing source files using Quick Look. Another great one to have.
3.6 - Removing things from the Menu Bar
Loads of apps like to have Menu Bar items, and mine’s already quite cluttered, even with Ice. I therefore go into each of these apps and turn them off:
- Notion
- ChatGPT
- Figma
Appendix A
1. Fix ownership of all Homebrew directories
sudo chown -R "$(whoami)":admin /opt/homebrew2. Ensure everything inside is writable
chmod -R u+w /opt/homebrew3. Fix related caches (Homebrew sometimes touches these)
sudo chown -R "$(whoami)":admin ~/Library/Caches/Homebrew
chmod -R u+w ~/Library/Caches/Homebrew
4. Reset permissions on the Homebrew temp directory
sudo chown -R "$(whoami)":admin /private/tmp(Not always required, but avoids rare permission problems when brew extracts packages.)
After running the commands, run:
brew doctor